How to Build a Ground Level Deck - A Comprehensive Guide
Learn the step-by-step process of building a ground level deck with our comprehensive guide. Get expert tips and insights to ensure a successful deck-building project.

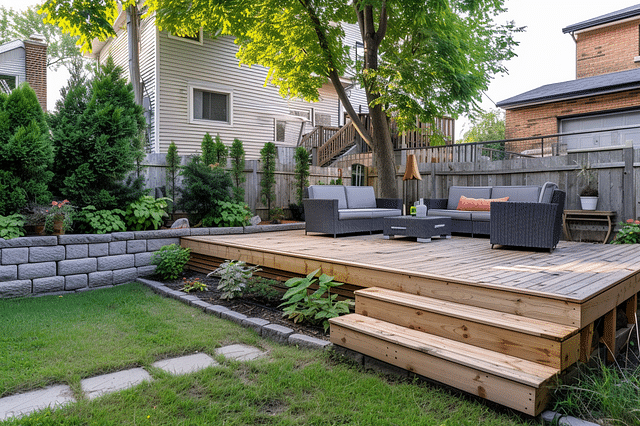
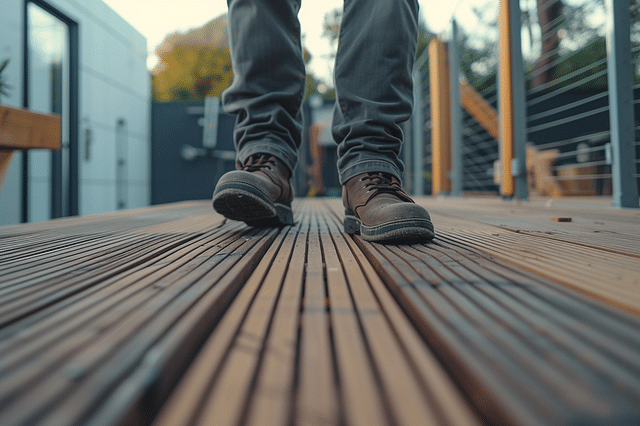
Have you ever dreamed of having your own outdoor oasis where you can relax, entertain, and enjoy the beauty of nature? Building a ground level deck is an excellent way to transform your outdoor space and create the perfect spot for all your outdoor activities. Whether you want to host barbecues, spend time with family and friends, or simply bask in the sun with a good book, a ground level deck provides the ideal foundation that blends seamlessly with your backyard.
In this comprehensive guide, we will walk you through the step-by-step process of building a ground level deck, from planning and designing to construction and finishing touches. Whether you're a seasoned DIY enthusiast or a beginner looking to take on your first major outdoor project, this guide will provide all the information and guidance you need to successfully build a ground level deck. So grab your tools and let's get started!
What is a Ground Level Deck?
A ground level deck, as the name suggests, is a deck that is built directly on the ground or at a very low height. Unlike raised decks, which are supported by posts and beams, ground level decks are typically built directly on a concrete slab or a gravel and sand foundation. They are a popular choice for properties with flat or gently sloping terrain, as they require less excavation and are easier to install.
Ground level decks can be made from a variety of materials, including wood, composite, or PVC decking boards. The choice of materials will depend on your personal preferences, budget, and the climate in your area. Regardless of the materials used, ground level decks offer a seamless transition between indoor and outdoor spaces, providing a comfortable and inviting area for relaxation, dining, and entertaining.
Why Build a Ground Level Deck?
There are several reasons why you might choose to build a ground level deck:
Accessibility: Ground level decks are a great option if you want to create an accessible outdoor space. They are easy to enter and exit, making them an ideal choice for individuals with mobility challenges or small children.
Cost: Building a ground level deck is generally more affordable than building a raised deck. Since they require less structural support and excavation work, they can be a cost-effective way to expand your outdoor living area.
Versatility: Ground level decks can be designed to fit a variety of purposes and styles. Whether you envision a cozy seating area, a dining space, or a spot for your grill and outdoor kitchen, a ground level deck can be customized to meet your specific needs and preferences.
Maximized space: If you have a small yard or limited space, a ground level deck can provide you with valuable additional square footage for outdoor living. It can help you make the most of your space while still maintaining a connection with nature.
Now that we've covered the basics, let's move on to the next section, where we'll guide you through the planning and preparation process for building a ground level deck.
Planning and Preparation
Before you dive into building your dream deck, it's essential to take some time for planning and preparation. This step will help ensure that you have everything you need and that your deck will be built in the right location, following all the necessary regulations. Here are some key steps in planning and preparing for your deck-building project:
Choosing the Right Location for Your Deck
The location of your deck is crucial for both practical and aesthetic reasons. Consider factors such as sun exposure, views, privacy, and accessibility when choosing the right spot. You want to create a space that allows you to enjoy the outdoors while also blending well with your home's architecture and landscaping.
Measuring and Marking the Area
Once you've decided on the ideal location, it's time to measure and mark the area where your deck will be built. Use a measuring tape to accurately determine the dimensions of the deck. Consider the size and shape of your furniture and any additional features, such as stairs or railings, when determining the size of the deck.
Using stakes, string, and spray paint, mark the perimeter of the deck on the ground. Double-check your measurements and make any necessary adjustments before moving on to the next step.
Checking for Building Codes and Permits
Before you start building, it's crucial to check your local building codes and regulations. Different areas have specific requirements for deck construction, such as height restrictions, railing specifications, and structural guidelines. Contact your local building department or visit their website to understand the rules and determine if you need any permits.
Adhering to building codes ensures that your deck is safe and structurally sound. Failing to comply with these regulations can result in fines and even having to dismantle your deck.
Gathering the Necessary Tools and Materials
To make the deck-building process smoother, collect all the necessary tools and materials before you start. Some common tools you may need include a circular saw, drill, level, tape measure, and a hammer. The materials required will vary based on your design and chosen decking material, such as lumber, screws, nails, and concrete footings.
Make a checklist of all the items you need and ensure they are easily accessible before you begin the construction process. This way, you won't have to halt your project to run to the store for missing items.
By taking the time to plan and prepare, you set yourself up for a successful deck-building project. Consider the location, measure and mark the area accurately, familiarize yourself with building codes, and gather all the tools and materials you need. With these tasks completed, you're ready to move on to the next phase of your project: the deck construction itself.
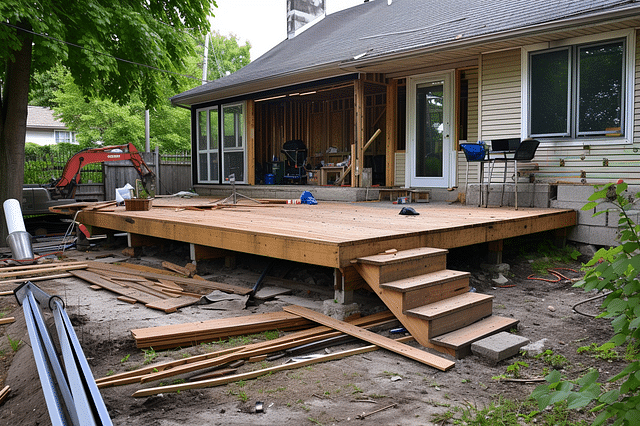
Building the Foundation
Before you can start building your dream deck, you need to create a solid foundation. This is a crucial step that will ensure the stability and durability of your deck for years to come. In this section, we will walk you through the important steps of clearing and leveling the ground, installing ground posts or concrete piers, and attaching beams and joists to create the deck frame.
Clearing and Leveling the Ground
The first step in building a strong foundation for your deck is to clear and level the ground where the deck will be located. Start by removing any grass, weeds, rocks, or other debris from the area. Use a shovel or a garden rake to even out the soil and create a level surface.
It's important to take your time during this step to ensure that the ground is properly prepared. A level surface will not only provide a stable base for your deck but also make the installation process much easier.
Installing Ground Posts or Concrete Piers
Once you have a level ground, it's time to install the support system for your deck. Depending on the size and height of your deck, you will need to either install ground posts or concrete piers.
Ground posts are wooden posts that are buried directly into the ground. They provide strong support for your deck and are a popular choice for smaller decks. Make sure to dig holes for the ground posts that are deep enough to secure them firmly in the ground.
For larger or elevated decks, concrete piers are a more suitable option. Concrete piers are cylindrical pillars made of reinforced concrete that are designed to bear the weight of the deck. They are typically placed at specific intervals and provide a sturdy base for the beams and joists.
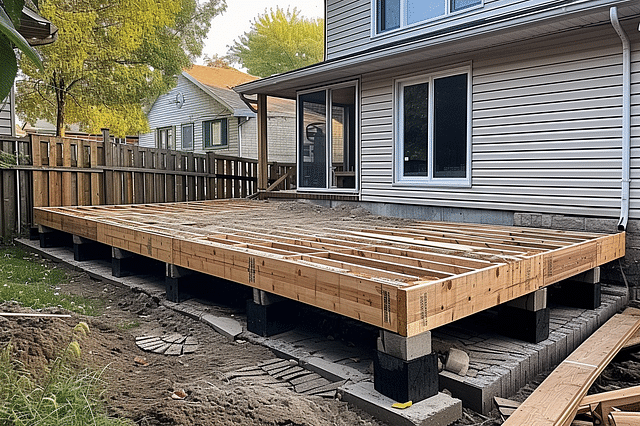
Attaching Beams and Joists to Create the Deck Frame
Once the support system is in place, it's time to attach the beams and joists to create the deck frame. Beams are horizontal elements that span the length of the deck and provide support for the joists.
To attach the beams, place them on top of the ground posts or concrete piers and secure them with nails or bolts. Make sure the beams are level and evenly spaced.
Next, you'll need to install the joists, which are horizontal elements that run perpendicular to the beams and provide the structure for the deck's surface. Place the joists on top of the beams and secure them with nails or joist hangers.
When attaching the beams and joists, it's important to follow building codes and regulations to ensure the stability of your deck. Take care to use the correct materials and appropriate fasteners for the job.
Once the beams and joists are securely attached, your deck frame will be ready for the next steps in the construction process.
Decking Materials and Design
When it comes to designing your dream deck, there are several factors to consider. From choosing the right material to calculating the amount needed and adding the finishing touches, careful planning and consideration will ensure a beautiful and functional outdoor space. In this section, we will cover everything you need to know about decking materials and design.
Choosing the Right Decking Material
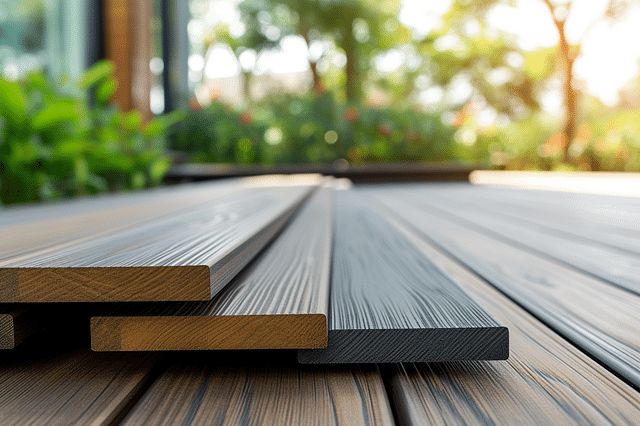
The first step in creating your deck is choosing the right material. There are several options available, each with its own unique features and benefits. Let's take a closer look at some popular choices:
Pressure-Treated Wood: This is a common and cost-effective option for deck construction. Pressure-treated wood is resistant to rot and decay, making it durable and long-lasting. It can be stained or painted to achieve the desired look.
Composite Decking: Made from a combination of wood fibers and recycled plastic, composite decking offers the look of wood without the maintenance. It is resistant to fading, staining, and scratching, making it an excellent choice for those seeking a low-maintenance deck.
PVC Decking: PVC decking is made entirely from synthetic materials, providing exceptional durability and resistance to moisture, mold, and mildew. It requires minimal maintenance and is available in a variety of colors and styles.
Natural Hardwoods: If you're looking for a luxurious and natural aesthetic, hardwood decking is an excellent choice. Options such as teak, cedar, and redwood offer beauty and durability, but require regular maintenance to preserve their appearance.
When choosing a decking material, consider factors such as budget, maintenance requirements, and desired aesthetic. It's also essential to consider the climate and environmental factors in your area to ensure the material will withstand the elements.
Calculating the Amount of Decking Needed
Before purchasing materials for your deck, it's crucial to accurately calculate the amount of decking needed. This will prevent any costly and time-consuming delays during the construction process. Here are the steps to calculate the decking materials required:
- Measure the length and width of your planned deck area in feet.
- Multiply the length by the width to get the total square footage.
- Determine the width of the decking boards you plan to use.
- Divide the total square footage by the width of the boards to calculate the linear footage needed.
For example, if your deck area is 300 square feet and you plan to use 6-inch wide decking boards, you will need 50 linear feet of decking (300 / 6 = 50).
It's always a good idea to add a little extra material to account for waste and any future repairs.
Design Considerations for Ground Level Decks
Ground level decks are an excellent option for homeowners who want to create an accessible outdoor space without the need for a raised platform. When designing your ground level deck, there are a few key considerations to keep in mind:
Site Preparation: Before constructing a ground level deck, it's important to properly prepare the site. Remove any grass, weeds, or debris and ensure that the ground is level.
Ventilation: Proper air circulation is crucial for preventing moisture build-up and potential damage to the deck. Design your ground level deck with adequate ventilation, such as leaving gaps between the boards or using lattice panels.
Support and Foundation: While ground level decks may not require support beams or footings like raised decks, it's still important to ensure a solid foundation. Use pressure-treated lumber for the frame and consider adding gravel or paver stones to improve drainage and stability.
Protection Against Moisture: Even with proper site preparation, ground level decks are more susceptible to moisture. To protect your deck, consider using a water-resistant or waterproof coating on the decking boards and apply a sealant to any exposed wood.
Enhancing the Deck with Railing and Stairs
To fully complete the look and functionality of your deck, consider adding railing and stairs. Not only do they provide safety and accessibility, but they also add an aesthetic element to your outdoor space.
Deck Railing: Deck railing not only provides safety but also serves as a decorative element. There are various options available, including wood, metal, glass, and composite. Choose a style that complements your deck design and meets local building codes.
Deck Stairs: If your deck is elevated or you have multiple levels, stairs are essential for easy access. The design and construction of deck stairs should follow local building codes to ensure they are safe and secure.
Make sure to consider the materials and design of your railing and stairs to ensure they match the overall style and aesthetic of your deck.
By considering the different decking materials, accurately calculating the amount of materials needed, and incorporating thoughtful design elements such as railing and stairs, you can create a beautiful and functional deck that enhances your outdoor living space.
Building and Installing the Decking
When it comes to building and installing the decking for your outdoor space, there are several important steps to consider. In this section, we will walk you through the process of laying and fastening the deck boards, creating expansion gaps, and applying finishes and sealants to ensure a beautiful and durable deck.
Laying and Fastening the Deck Boards
Once you have prepared the deck frame, the next step is to lay and fasten the deck boards. Start by placing the first board along one edge of the deck and ensure that it is square with the frame. Use decking screws or nails to secure the board to the frame, making sure to leave a small gap between each board for water drainage.
Continue laying and fastening the remaining boards, ensuring they are evenly spaced and aligned with the first board. It may be helpful to use a chalk line or a straight edge to guide you in keeping the boards straight. Be sure to check for any overhanging edges and trim them if necessary.
Creating Expansion Gaps
As wood expands and contracts with changes in temperature and humidity, it is important to create expansion gaps between deck boards. These gaps allow the wood to breathe and minimize the risk of warping or cracking. The recommended gap size is typically around 1/8 to 1/4 inch, but check with your specific decking material for manufacturer recommendations.
To create the expansion gaps, you can use special spacers or simply place nails or screws temporarily between the boards while fastening them. Remember to remove the spacers or nails once the boards are secured.
Applying Finishes and Sealants
To protect your deck from the elements and enhance its appearance, it is important to apply finishes and sealants. Before applying any finish, clean the deck boards thoroughly to remove any dirt, debris, or previous coatings. You can use a deck cleaner or a mixture of mild soap and water for this purpose. Rinse the boards thoroughly with clean water and allow them to dry completely.
Once the deck is clean and dry, you can apply a wood stain, paint, or a clear sealant, depending on your preference. Follow the manufacturer's instructions for application, and make sure to apply the finish evenly and thoroughly to all exposed surfaces, including the end grain of the boards.
Applying finishes and sealants not only adds beauty to your deck but also helps to protect it from the damaging effects of UV rays, moisture, and mold or mildew growth. Regular maintenance, including reapplication of finishes as needed, will ensure the longevity and durability of your deck.
With the deck boards laid and fastened, expansion gaps created, and finishes and sealants applied, you are now one step closer to enjoying your outdoor oasis. In the next section, we will discuss the essential steps for maintaining and caring for your deck to ensure its long-lasting beauty and functionality.
Safety and Maintenance
When it comes to your deck, safety should always be a top priority. Incorporating safety features and regularly maintaining your deck will not only prolong its lifespan, but it will also ensure the well-being of those who use it. In this section, we will discuss how to incorporate safety features into your deck, provide tips for regular maintenance and inspections, and share strategies for protecting your deck from moisture and decay.
Incorporating Safety Features into Your Deck
When designing or renovating your deck, it's essential to incorporate safety features to minimize the risk of accidents and injuries. Here are some key considerations:
Railings: Install sturdy railings around the perimeter of your deck to prevent falls. The railings should be at least 36 inches high, with vertical balusters spaced no more than four inches apart to prevent small children from slipping through.
Stairs: Ensure that your deck stairs are stable and have secure handrails. Each step should be of equal height and depth to promote safe and comfortable passage.
Lighting: Install adequate lighting to ensure visibility on your deck, especially in the evening or at night. This will help prevent trips and falls.
Slip-resistant surfaces: Choose deck materials that are slip-resistant, especially in areas prone to moisture or heavy foot traffic. Consider using non-slip coatings or applying textured strips to the deck surface.
Remember, incorporating safety features into your deck is not only responsible but also mandated by building codes in many jurisdictions. Be sure to check your local regulations and comply with any requirements.
Regular Maintenance and Inspection Tips
Regular maintenance and inspections are crucial to keeping your deck safe, structurally sound, and aesthetically pleasing. Here are some tips to help you maintain your deck:
Cleaning: Regularly sweep your deck to remove dirt, leaves, and debris. Use a mild detergent and water solution to clean the surface, and avoid using harsh chemicals that can damage the deck material.
Inspections: Inspect your deck at least once a year, or preferably before the start of each season. Look for signs of wear and tear, such as loose boards, wobbly railings, or rusty fasteners. If you notice any issues, address them promptly to prevent further damage and potential accidents.
Repairs: Repair or replace any damaged or deteriorated components promptly. This includes replacing rotting or splintered boards, securing loose nails or screws, and reinforcing weak areas.
Finishing: Apply a protective finish, such as a stain or sealant, to your deck every few years. This will help preserve the wood and protect it from weathering, moisture, and UV rays.
By staying proactive with regular maintenance and inspections, you can identify and address any potential safety hazards before they become more significant problems.
Protecting the Deck from Moisture and Decay
Moisture and decay are common enemies that can compromise the integrity of your deck. Here are some strategies to protect your deck from these threats:
Proper ventilation: Ensure that your deck has adequate ventilation to prevent the buildup of moisture. This can be achieved by leaving enough space between deck boards or using lattice panels for ventilation.
Regular cleaning: Keeping your deck clean and free from debris helps prevent moisture buildup and reduces the risk of mold or mildew growth. Regularly sweep the deck and remove any leaves or other organic matter.
Waterproofing: Apply a waterproofing sealant to your deck to create a protective barrier against moisture. Choose a product specifically formulated for your deck material and follow the manufacturer's instructions for application.
Damp-proofing: Use a damp-proof membrane between the deck boards and the underlying structure to prevent moisture from seeping into the wood. This is especially important if your deck is built close to the ground or in a damp area.
Regular resealing: Over time, the protective finish on your deck can wear off. It is essential to regularly reseal the deck to maintain its waterproofing properties. Check the manufacturer's recommendations for the appropriate resealing frequency.
By implementing these measures, you can significantly extend the lifespan of your deck and protect it from the damaging effects of moisture and decay.
Trending products
Shop outdoor accessories
Frequently asked questions
- Why should I build a ground level deck?
- Building a ground level deck is a great option if you have uneven or sloping terrain, or if you want to create an outdoor space that's closer to the ground for easy access and a seamless connection with your backyard.
- What materials should I use for a ground level deck?
- For a ground level deck, it's best to use materials that are resistant to moisture and rot, such as pressure-treated lumber or composite decking. These materials are durable and will withstand outdoor conditions for years to come.
- How do I prepare the site for a ground level deck?
- Before starting the construction of your ground level deck, make sure to clear the area of any vegetation, level the ground, and lay down a weed barrier. This will create a stable foundation for your deck and prevent weed growth.
- Do I need a permit to build a ground level deck?
- Permit requirements vary depending on your location, so it's essential to check with your local building department. In some cases, you may need a permit for a ground level deck, especially if it exceeds a certain size or height.
- How do I determine the size and layout of my ground level deck?
- Consider the available space, intended use of the deck, and any landscaping features when determining the size and layout of your ground level deck. It's also a good idea to sketch out a plan and take measurements before proceeding with the construction.
- What tools do I need to build a ground level deck?
- Some of the essential tools you'll need for building a ground level deck include a tape measure, level, circular saw, drill, screwdriver, hammer, and safety equipment like goggles and gloves. It's also helpful to have a post hole digger or auger if you're installing footings.
- How do I construct footings for a ground level deck?
- When building a ground level deck, footings are not always necessary. However, if you're constructing your deck on sloping terrain or in areas with poor soil conditions, it's recommended to use concrete footings to provide stability and prevent shifting or sinking.
- What are some maintenance tips for a ground level deck?
- To keep your ground level deck looking its best, it's important to regularly clean it with mild soap and water, remove debris, and inspect for any signs of damage or rot. Additionally, consider applying a protective stain or sealant every few years to prolong its lifespan.
- Can I install a railing on a ground level deck?
- While it's not always required, installing a railing on a ground level deck is a good safety measure, especially if the deck is elevated or situated near a drop-off. Check your local building codes to determine if a railing is necessary for your specific deck height.
- How long does it take to build a ground level deck?
- The duration of building a ground level deck can vary depending on factors such as the size of the deck, your experience level, and the availability of tools and materials. As a general estimate, it may take a couple of days to a week to complete the project.
Are you looking for more ideas?
Have a look at these other guides about improving your garden and patio to create your dream outdoor space!

Are you looking for more ideas?
-
- Role
- Steps to Make a DIY Hose Reel for a Beautiful Garden
- Description
- Learn how to make your own DIY hose reel for a beautiful garden with our step-by-step guide. Save money and add a touch of customization to your outdoor space.
-
- Role
- Ideas to Improve Your Front yard in the Summer
- Description
- Unlock the secrets to transforming your front yard with these creative and practical ideas for summer landscaping. Enhance the beauty of your lawn and elevate your curb appeal with expert tips and tricks. Start your front yard transformation today.
-
- Role
- The Ultimate Guide to Creating a Colorful Summer Garden
- Description
- Unlock the secrets of a vibrant summer garden! Discover expert tips on what to plant in April for a colorful and stunning garden this summer. Don't miss out, read our ultimate guide now!
-
- Role
- How to Choose the Right Gazebo for Your Backyard
- Description
- Discover the best gazebo for your backyard oasis! Our comprehensive guide will help you choose the right gazebo at the perfect cost.